A little about this blog!

Ugh, yes another blog. I happen to have 2, this being my second one at the moment. I own a nice little graphic arts business where I custom design restaurant menus, flyers, and business cards.

I also make party invitations. So it was only natural that I add my little 'mommy' recipes to my blog now and then (okay now more then later). These are my little 'mommy is busy' let me whip something up real quick for a party snack or even a gift. I use a lot of these recipes in my business when new clients come so they have something to snack on. Great idea if you ask me lol!

And of course they appreciate the thought. Anyways, hope you find something useful out of this, I have!

Friday, December 24, 2010

Rainbow cake to go with the yummy cupcakes!

Some people actually have told me that they HATE cupcakes! "They're too hard to frost in a hurry" Hmm, well for those people I came up with a solution. Okay my sister in law did but give me some credit for getting it on the web!

For this recipe instead of the traditional egg/milk/oil you add to the cake mix she has added diet Sprite! This is for a 1 point cake mix for the much used "Weight Watchers" program. If you aren't on the program, or just really don't care to lose weight, feel free to use the asked for ingredients on the box. Honestly it tastes really good with diet Sprite and the texture comes out the same.


This cake is suitable for many occasions:
  • A child’s birthday
  • Your mom’s birthday
  • Coming out to your conservative parents
    • If you’re a lesbian, they’ll be thrilled that you won’t be forgoing your feminine kitchen duties.
    • If you’re the kind of gay dude who makes cakes for your parents, they were probably on to you anyway.
  • Coming out to your conservative parents on your mother’s birthday
  • Your friend’s jam band CD release party
. . . so I’m sure you’ll find a use for this recipe soon. Okay, on with the ingredients. For this cake we used 2 boxes! This was done, because when we used only one for some reason everyone thought there wasn't enough! lol You may use only one if you want.

how to: rainbow cake!

That’s all. Notice the lack of fat in here? Mmmmmm . . . chemicals. Though I don’t need to defend my method thanks to the double-dub (WW) aspect, even when I make a “real” cake I usually use box mix because let’s face it: Betty’s been doing it way longer than I have, and has pretty much perfected the art.

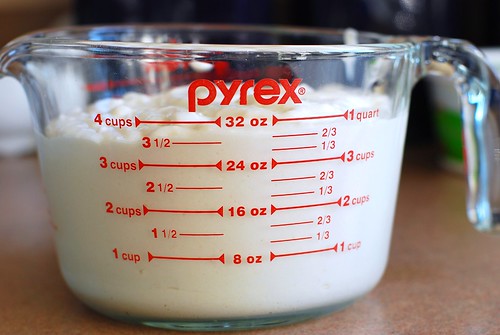
1. Pour 2-12 oz cans of soda into the  two boxes of cake mix. (1 can if you're using 1 box)
No eggs, no oil, no water, no sweat. 
 
how to: rainbow cake!
     
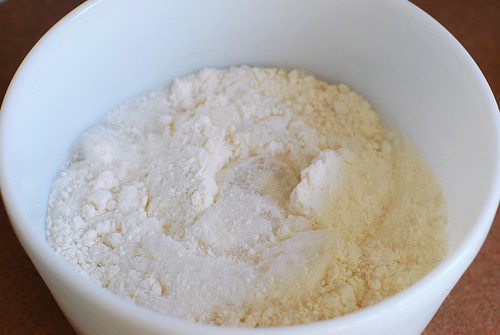
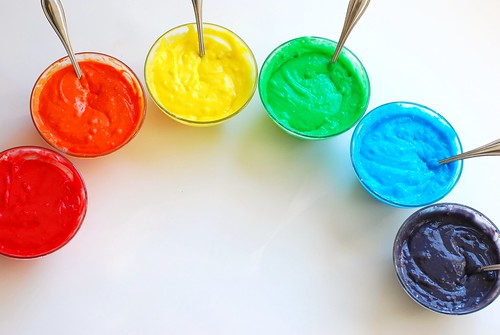
     2. Measure out 60 ozs cake mix because I have 6 different colors
(30 oz. if you are using only 1 box of cake)

how to: rainbow cake!
  
  2. It worked  out to  be about 1/2 c per color. (3/4 cup if your using 1 box)
Add one color to each divided cake mix.
 
how to: rainbow cake!

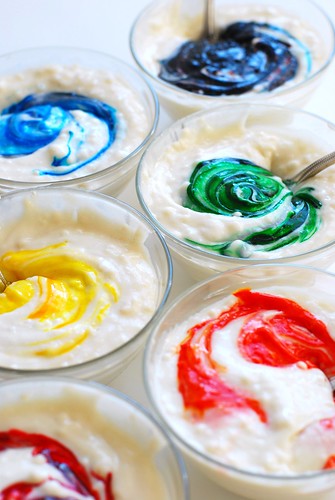
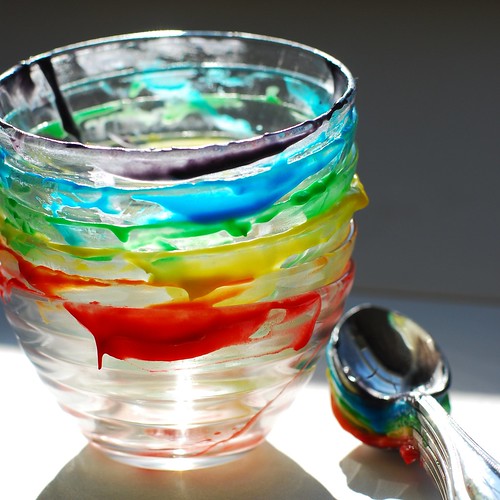
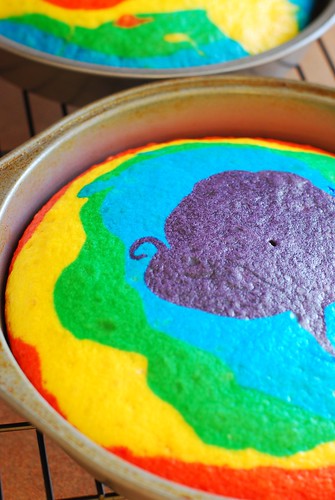
As you can see the gel pigment dye is really colorful, you can also use regular liquid food coloring but you will not get this vibrant result!

how to: rainbow cake!
    
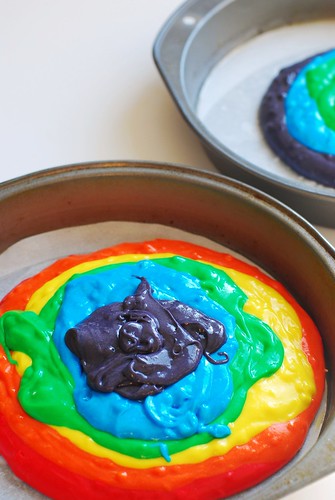
  The first color you drop into the pan, use about 2/3 of the mix for that colour. Otherwise, the top (last) colour will really dominate. I used a heaping 1 cup of each colour. (1/4 cup if you're using only 1 box.)
 
how to: rainbow cake!

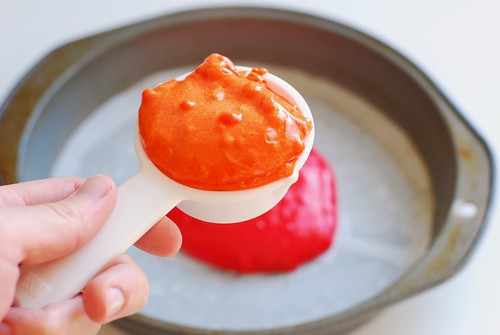
Drop the colors, one by one, into the middle of the pan, in neat little gobs. Remember the cake is going to be sliced in the side there, so mixing it around on top isn’t going to make your slices any more psychedelic (trust me, I did the three-dimensional thinking for you already).

When you’re three colors in, start doing the reverse with the other pan. Since I’m going in rainbow order: red, orange, yellow, green, blue, purple, I got from red to yellow in the first pan, then purple, blue, green in the second. This is so that your two pans are equal if your measurements aren’t exact (and they’re not likely to be).
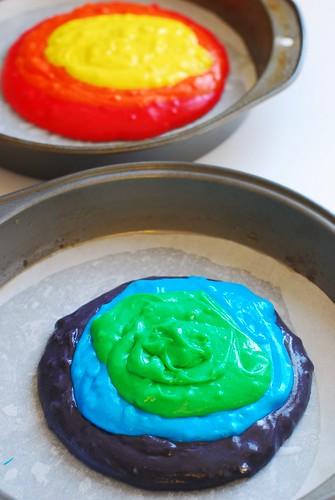
how to: rainbow cake!

Now finish up.

how to: rainbow cake!

Cook according to the box’s baking instructions and do your dishes while you wait!

how to: rainbow cake!

Such lovely dishes!
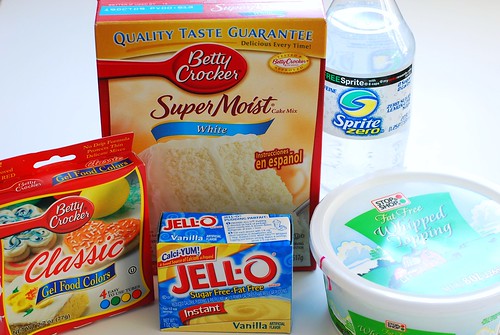
Now for the frosting: 1 box of fat free sugar free pudding mix to one 8 oz fat-free/sugar-free/light whipped topping.  (2 boxes of pudding if your using 2 boxes of cake and 2 8 oz tubs or 1 16 oz tub)

how to: rainbow cake!

Obviously this is optional, more for the fat-free/low-fat version if you still are holding on to that 1 point per slice cake! If not then use any frosting you darn well please!

how to: rainbow cake!


how to: rainbow cake!

If you used above recipe for the frosting, it might be a little tough to spread, so treat it like a butter cream (or so I'm told I've never used butter cream lol).  Putting gobs all over, then smoothing in worked well for me.

how to: rainbow cake!

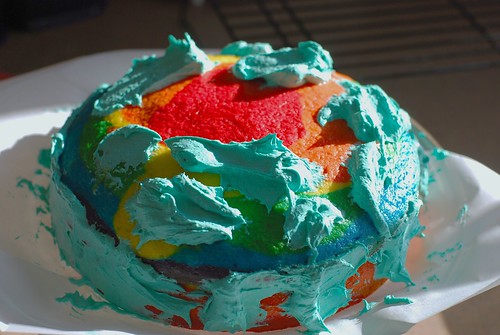
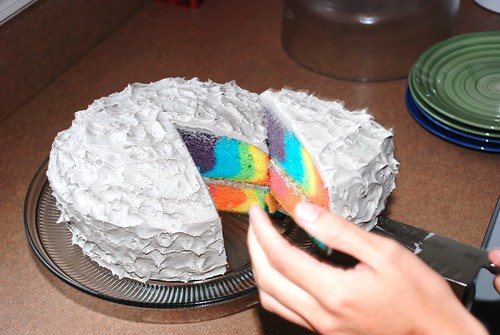
My attempt at frosting, it’s so pretty-looking?

how to: rainbow cake!

Here’s what this particular cake looked like with only 1 box. See how it’s tiny and too rounded it kind of is? It’s a mistake I’ll only make once.

how to: rainbow cake!

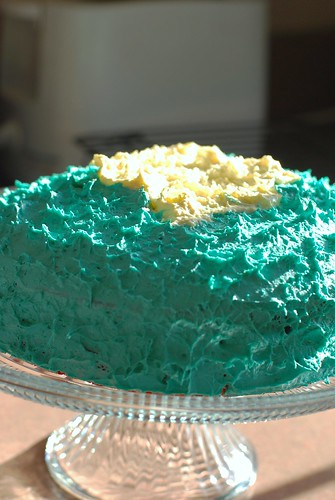
Here’s what this cake looks like with 2 boxes. And a better froster-er!

DSC_0598

Easily put:
 
Sunny Day Rainbow Cake
2 boxes white cake mix
24 oz of clear diet soda (2 cans, ginger ale and sprite work well)
Gel food colouring
16 oz whipped topping
2 oz instant fat-free sugar-free pudding mix (2 smallish boxes)

The Dieting
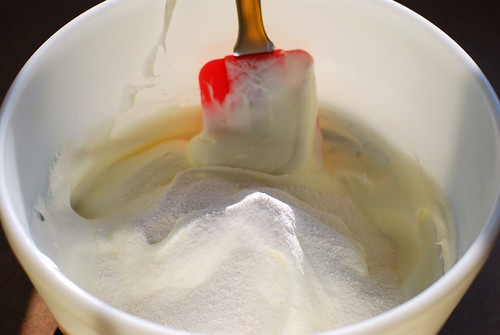
Mix the cake mix with the soda according to regular instructions on box. It will be lumpy afterward. Again, you can use any white cake recipe you want, this is just how I do it.

The Rainbowing
Measure the total volume (by my estimate, 64 oz), then divide by 6 and measure into separate bowls. There are 8 oz in a cup, so 64/6 = 10 to 11 oz, or 1 cup + 2 tbsp.
Stir color into each bowl with its own spoon. For the first color into the pan, measure out 2/3 to 3/4 of your mix (in this case about 1 c) as close to the middle as you can. Drop in your first three colors, then work on the other pan with the last three colors. So if you’re doing rainbow order, the first pan should have red, then orange, then yellow, and now the purple, blue and green go into the second pan. As a recap, this is so both layers are roughly the same size.
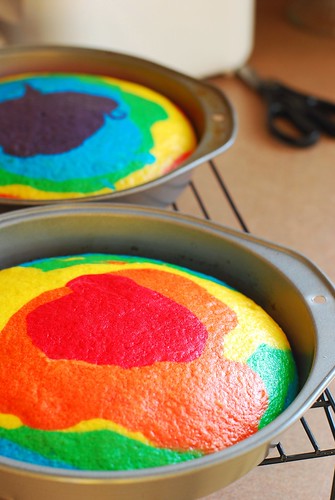
Bake the cake for however long the box tells you to bake it. Check it when the box says to, but usually it’ll need an extra 5 or 10 minutes or maybe more because of the density of the soda method. Just keep baking, checking back every 5 minutes or so until a toothpick to the center comes out clean. Let cool completely before moving to a wire rack.

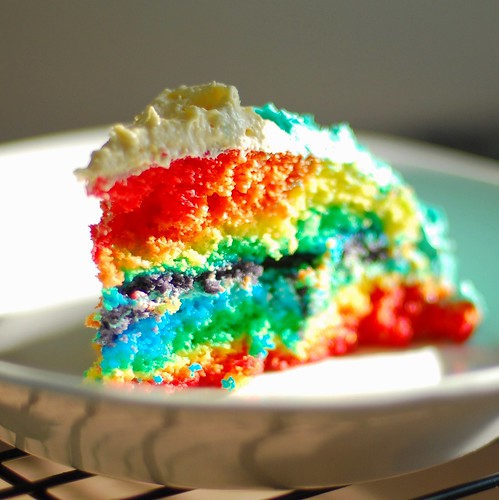
Then there you go! A sexy cake if I do say so myself :) Eat up and don't forget to share!
Another amazing job from "Our Best Bites" There reallly is some talent over there ;)

This is my favorite cake recipe of all time! The only difference is that I add some colorful sprinkles into the mix so you get even more delicious colors! If you're super creative you can even add some pudding in the middle to make it even more tasty. Hmm, an idea for the next blog? Possibly!

Alright here it goes: Gel food colors work especially well for this. Gel color adds a ton of color with a small amount of dye. You can find gel colors at craft stores like Michaels and Roberts, and in the cake decorating isle of Walmart. If using red, make sure to get the one that says "No Taste"


Divide your batter and tint each one


Then layer it by color into the cupcake papers.  (See my tips in the recipe for easy layering).  Sometimes I do red on top and sometimes I do the reverse so blue is on top.


Bake them up


And cool them on a rack before frosting.


Then you can frost and decorate to your heart's desire!


The best part comes when you peel off that paper.  Use white liners to show off the colors, or foil or dark liners to make it a surprise!


Even better is taking the first bite and seeing the inside:


Try them with the color of your favorite sports team, or your kids' school colors.  They're sure to be a hit!

Colorburst Cupcakes

1 white cake mix
2 eggs
1 C yogurt (any smooth textured fruit flavor is fine!) or sour cream
1/2 C milk
1/3 C vegetable oil

Combine all ingredients until incorporated (about 30 seconds). Scrape sides of bowl and then beat on med-high speed for 2 minutes.

Divide batter according to how many colors you are using. I used 5 colors and it worked out to a little over 1 cup for each color, but each cake brand will be slightly different.

Use food coloring to color batter to desired intensity.


To get a layered stripe like I used, you'll want to put a spoonful of each color in the cupcake one at a time. The batter is thick, so it won't spread on it's own. A great tip is to set out a little bowl of water where you're working. Dip your finger in the water and then gently spread the batter out. The water will make it so the batter doesn't stick to your fingers.

Another tip is to use a measuring spoon and some water to measure out how many teaspoons/tablespoons are going to fit in your cupcake. Then divide that by how many colors you have so you know how much of each color to use for each cupcake. For my 5 colors, it worked out perfectly with 2 t of each color in each cupcake. So I put in 2 t of blue in the bottom of each cupcake and spread it out with my finger. Then I put in 2 t of green on top of that, then yellow, etc.

Bake them according to the package directions, until a toothpick comes out dry.

Hot Fudge Brownie Sundae

Okay there are hundreds of recipes on the web for this great invention but most of them are from scratch and lets face it pssh most of the working mommies out there picked up the stuff from the store and just need to know how to assemble it right!

And hey there's nothing wrong with that, I got mine from Walmart, and set offf to make the perfect Hot Fudge Brownie Sundae!

Some of you remember the other day I made some amazing fudge, but unfortunately most of it was for family, and the rest my munchkins happen to eat up last night even though I was saving it for today! So I went to my local Walmart and picked up these ingredients:

  • Brownie bites
  • Fudge
  • Vanilla Ice Cream
  • Whipped Cream
  • Pecans or other nut (optional)
  • Cherries (optional)
  • Sprinkles (optional)
Okay, so you got all your ingredients right? Of course, now's the easy part. Get however many bowls or cups as you have people. Start one at a time or do the same step for all.

  1. Assemble the sundae, you can start by making one full sundae or do each step x number of times for each bowl/glass. If you happen to have a tall sundae glass use those, they sell them almost anywhere now but I got mine at Walmart (again, yes I'm an avid shopper there!) Place the brownie on the bottom.
  2. Drizzle about 2 tbs. of the hot fudge sauce over the brownie.
  3. Add about 2 large scoops of ice cream, this obviously depends on how big your brownie is!
  4. Drizzle more hot fudge on top again.
  5. Top with whip cream, nuts, sprinkles, whatever!
  6. Drizzle a small amount of hot fudge over all to give it a delicious look! And eat up!

Hot Fudge Gifts

Remember back when when I posted the Honey Citrus Vinaigrette recipe and talked about how sometimes you can just look at the ingredient list for a recipe and instantly know in the pit of your soul that it would make you happy? Well I have three words for you: Chocolate. Butter. Sweetened Condensed Milk. Any questions? I didn't think so. If you're wondering how something so incredibly simple could be so incredibly delicious, then you'll just have to make it to find out. This was a favorite in our house growing up, and we especially loved it at Christmas time over peppermint ice cream. The great thing is that these are ingredients that (at least at our house) are always in the pantry. I promise once you make this you'll never buy that bottled Hershey's stuff again! And let's face it; if you're making homemade ice cream already, it deserves the best :)

Three of my tummy's favorite things

Hot Fudge Sauce

3oz semi-sweet chocolate* (3 squares of baking chocolate, or about 1/2 C chocolate chips

1/4 C butter (that's a half of a stick folks. Admit it, at least one of you didn't know that)

1 Can Sweetened Condensed Milk

*I wouldn't use milk chocolate for this, it's way too sweet, however both dark and bittersweet are awesome

1. If you're using baking squares, chop them up into small pieces so they melt easier. I chop the butter up into small chunks too.


2. Okay, it's not rocket science. Put it in a pan on medium heat and melt it all together till it's smooth, creamy, and just looking at it gives you happy thoughts.

3. If you have leftovers (but let's be honest, you'll have to quadruple the recipe to have leftovers) then put it in an airtight container in the fridge. It will harden into a soft, gooey fudge like consistency. Then keep a spoon handy on the counter and dip it in every time you pass by. This serves the same purpose as the always-open bags of chocolate chips that Kate and I both have in our pantries. Don't deny it Kate.

Something else that might come in handy: The SINGLE SERVING.
In the comments of Kate's Brazilian Lemonade post, I mentioned this great little invention:


The tiny can of sweetened condensed milk.

You find them not with the baking things, like regular sweetened condensed milk, but in the Latin Foods isle in a little six pack. They are PERFECT for all sorts of things when you don't need a whole can. Each cute little can has 3.5 oz, which is 1/4 the size of a normal can. And it makes the most perfect single serving of this fudge sauce, so here's the quantities for that!

----------------------------------------------------------------------------------------

Just for One:

1 tiny can sweetened condensed milk
2 T chocolate chips
1T butter

Just pop it in the microwave and heat in 45 second intervals until smooth!


----------------------------------------------------------------------------------------

I love to put these into cute little jars and give them away as gifts. One year for Christmas I filled little pints with homemade peppermint ice cream and topped it with a jar of chocolate sauce and a big red ribbon. You could do the same with caramel (that's buttermilk syrup aka caramel sauce in the bottom jar) how cute are these?


It also works as a great quick and easy fondue!

Wanna try some? Give me a shout if you're a local and one of these is yours!


This makes a darling Christmas gift!


Storage: This is just fine kept at room temp for a day, but if you are going to keep it overnight or for an extended period of time, pop it in the fridge and just reheat in the microwave.

And of course my favorite thing to do with Fudge top it on some ice cream, add some whip cream, and a cherry and:

Now of course we have to have the hot fudge brownie recipe!

Dipped Pretzel Rods

One of my favorite things to decorate and give away at the holidays is dipped pretzel rods. 

They're easy, relatively inexpensive, and universally loved by kids and adults alike. Place them in a clear plastic bag, tie a bow and they're done! 

One of the greatest things is that you can customize them according to tastes and holidays--in October, I made dark chocolate/white chocolate magic wands dipped in colored sprinkles. For this go-around, I was inspired by everyone's caramel apple suggestions and REALLY wanted to do caramel, white chocolate, and cinnamon sugar for the pretzels. Here is what I discovered: 


1) Tasty as homemade caramel is, it's too thick, rich, and chewy to work on pretzels. You wind up with a mouthful of stickiness that's too hard to eat. Just buy a bag of Kraft caramels and don't beat yourself up about it. Also, homemade caramel is too thick on the pretzels. And they kept snapping in half after the caramel hardened. It just did not work for me on so many levels.
2) The cinnamon sugar, while great in theory, was too sweet on the pretzels. Also, it wasn't very pretty. I've toyed with the idea of mixing cinnamon (no sugar) in with the white chocolate before drizzling it on the pretzels. Someone do me a favor and try that and let me know how it goes! :)
3) You can do this however the heck you want. Try caramel. Chocolate. White chocolate. Sprinkles. Crushed candy canes. Get creative and festive and have fun!
This isn't so much a recipe as it is an idea, so I'll just give you some helpful tips I've discovered along the way.

--Walmart pretzel rods are the worst. I guarantee, at least 1/2 the bag will be broken when you buy it. Rold Gold pretzels look pretty in the bag, but the snappage factor is pretty high. I actually have found that Kroger pretzels are perfect for dipping! Who knew...
--If dipping in chocolate, melt 1 c. chocolate chips (or white chocolate chips) with 1-2 tsp. SHORTENING or vegetable oil (never, ever butter or olive oil; it will end in disaster) in the microwave, stirring at 30 second intervals. For drizzling, dip a fork in melted chocolate and drizzle as desired. Almond bark and Chocolate bark works great too.
--Keep the layers thin. It's tempting to load those puppies up, but pretzels are pretty fragile and you still want to be able to taste the pretzel underneath everything else.
--You want to dip the base layer about 1/2 to 2/3 of the way down the pretzel. To make any dipping easy, you can either melt the chocolate (or caramel...or whatever) on the stove top and transfer it to a mug or just melt it directly in the mug in the microwave. Then you can hold the pretzel in one hand and the mug handle in the other and maneuver it however you need to to coat the pretzel.

--After dipping, allow the excess to drip back into the mug. You can also roll the pretzel rod between your hands to spin the excess back into the mug.

--After dipping or decorating each layer, you don't want to ruin your pretty creation, so you can either allow them to harden with each end of the pretzel on a wide-mouthed bowl or you can use a cooling rack. Just be sure and spray whatever you use with non-stick cooking spray.


--Try to be patient and let the layers cool completely before dipping or drizzling. This is especially important if you're using two different kinds of chocolate. Otherwise, they'll melt right into each other and that ain't pretty.

After these had completely hardened, I placed them in cellophane treat bags and tied each one with holiday ribbon (9" of ribbon each, if you're super curious) and delivered the lot in a holiday gift bag.

You can get creative for just about any holiday- like Halloween!

Gourmet Hot Cocoa

I love hot chocolate.  That's why for Christmas eve I found THE BEST recipe on the web. Yes of course I tried it out and I like, really love it. One of my favorite things to do during the holidays is host a hot chocolate bar.  Sometimes we'll invite another family over, sometimes we'll host an adult get together, and sometimes I kick my husband and kiddos out of the house for a few hours and have a girls night in. 

Today I'm going to show you how to step it up a notch and put something together that's super trendy and super gourmet!  And you don't need to throw a party to enjoy these, it's a fun after dinner treat for the family, or just a cup for one on a chilly day.

I put together these flavor combinations with normal ingredients you can find in your own cupboards and at the grocery store.  I'm not listing ingredient amounts because it's really a to-taste thing.  If you're setting up spread for a get together, try putting all of these combos in little stations where people can put the add-ins in themselves.  I use little espresso sized cups so people can grab several tastes without feeling an overload!  First I'll show you my creations, and then I'll give you my hot chocolate tips.  Here we go...


Holiday Spice:  White hot chocolate, pumpkin pie spice, 
gingerbread marshmallows, cinnamon sprinkle. Optional: cinnamon oil or cinnamon syrup


I'm a sucker for raspberry and chocolate together so this was a natural choice.  This is great with both white or dark hot chocolate.


Raspberry Truffle: A couple chunks of dark chocolate on the bottom of the mug, hot chocolate or white hot chocolate, raspberry syrup or oil, whipped cream, raspberry drizzle, chocolate sprinkles.  For the raspberry drizzle either puree fresh raspberries or mix a little raspberry jam with warm water until smooth.


Possibly my favorite (and the least ingredients!)


Chocolate Hazelnut: Hot whole milk, nutella, chocolate whipped cream, chocolate shavings.


Yes, I'm putting chunks of fudge in my hot chocolate.


Caramel Fudge:  A chunk of fudge on the bottom of the mug, hot chocolate, caramel syrup, marshmallows, caramel sauce drizzle.


Can't go wrong with this classic.  If I'm at a coffee shop ordering hot chocolate, 9 times out of 10 I'll go with something like this!

Peppermint Stick:  White or Chocolate hot chocolate, peppermint oil, extract, or syrup, pink peppermint whipped cream, crushed candy canes.
Tips: When setting up a hot chocolate bar I think of the following things:
Pour it:  This is your base.  I like to have a hot chocolate, a white chocolate and plain milk.  I always use whole milk because it has such great flavor and a creamy texture.  If you're concerned about calories, c'mon we're dunking straight-up fudge in this stuff.  Since you're going to have lots of sweet things to add to your drink, I strongly recommend you take the time to make your own hot chocolate (as opposed to using a pre-made mix).  That way you can control the sugar and keep it low so it's not overly sweet with the add-ins.
Flavor it:  Think of things you can both stir in and melt in.  Extracts and oils work great but keep a tiny spoon or dropper so people don't add too much.  You can find a large assortment of flavored syrups in the coffee isle of the grocery store.  Also there are fantastic coffee creamers available during the holidays in all sorts of great flavors like gingerbread, peppermint, hazelnut, french vanilla, etc.  In addition to the normal flavors think of solid chocolate, peanut butter, nutella, etc.  Search through your pantry and fridge and be creative!
Top it:  Whip your own cream and you can add flavors and or colors.  Try cocoa powder for a chocolate whipped cream, or peppermint extract and pink food coloring for a candy cane twist.   Use spices, shavings, crushed candy or candy bars to add an extra touch.  Ice cream syrups like caramel and chocolate, or berry toppings are easy and show-stopping!
Stir it:  With all of these add-ins you'll need something to stir with!  Try dipping spoons in caramel or chocolate and rolling in crushed candycanes or toffee and then let them harden.  Or use candy canes or cinnamon sticks for extra flavor.
You'll notice in my pictures I have tiny cups!  That's one of my best tips.  Use espresso cups (available for pretty reasonable prices, my set was under $10!) so people can try a few different flavors and enjoy the richness of a small serving. 
 
And my #1 favorite tip is always always add a pinch of plain cinnamon to any hot cocoa mix, even the one from the store! You'll be amazed at what a little cinnamon can do!